
Home » flooring-installation » flooring-installation/vinyl-plank-flooring-installation
Vinyl Plank Floors That Stay Flat, Quiet, and Waterproof
Vinyl plank is the fastest growing flooring choice for homes in Cameron Park. It looks like real hardwood, handles water without damage, and costs less per square foot than most other options. When it is installed on a flat, dry subfloor with the right underlayment, it stays locked together, quiet underfoot, and easy to clean for 15 to 25 years.
We install click-lock floating, glue-down, SPC rigid core, and WPC vinyl plank for kitchens, bathrooms, basements, living rooms, and full-home layouts. We also handle old flooring removal, subfloor leveling, moisture barriers, underlayment, and all transition and trim work.
Every project starts with a free on-site visit. We check the subfloor type, test moisture levels, and measure each room before giving you a price. That step makes sure your quote matches the real scope of the job.
- C-15 Licensed
- Fully Insured
- Locally Owned
- Serving El Dorado County & Sacramento

What Makes Vinyl Plank Different From Other Flooring Types
Vinyl plank flooring, also called LVP (luxury vinyl plank), is a synthetic floor made from multiple layers pressed together. Each plank is designed to look and feel like real wood, but it is made from PVC and composite materials that do not absorb water.
A typical vinyl plank has four layers:
- Top layer (wear layer): A clear coating measured in mils (thousandths of an inch). Thicker wear layers resist scratches and scuffs better. Residential planks usually have 12 to 20 mil wear layers. Commercial-grade planks go up to 28 mil or higher.
- Print layer: A high-resolution photo of real wood grain printed onto the plank. This is what gives LVP its realistic look.
- Core layer: The rigid center of the plank. SPC cores are made from stone polymer composite. WPC cores are made from wood polymer composite. Both are waterproof, but they feel different underfoot.
- Backing layer: A thin base that adds stability and sometimes includes attached underlayment for sound reduction.
We measure each plank’s total thickness using a digital vinyl plank thickness gauge before installation. This tool reads the combined depth of all four layers down to 0.01mm. We check that the delivered product matches the manufacturer’s stated specs, because inconsistent plank thickness across a batch causes height differences at the seam lines. This quality check follows the ASTM F1700 Standard Specification for Solid Vinyl Floor Tile, which sets the dimensional tolerance standards for vinyl flooring products sold in the United States. Planks that fall outside the specified range get pulled from the job before they go down.

Why the Surface Under Your Vinyl Plank Decides How Long It Lasts
A vinyl plank floor floats on top of the subfloor. It is not nailed or glued down (in most residential installs). That means every bump, dip, or moisture pocket underneath shows through or weakens the seam locks over time.
Here is what we check & fix before any plank goes down:
- Flatness: no more than 3/16 inch variation over 10 feet
- Moisture content: concrete slabs tested to confirm they are within manufacturer limits
- Old adhesive residue from previous flooring (must be scraped or ground off)
- Loose or squeaky plywood panels (screwed down before underlayment)
For concrete slabs, we install a 6-mil polyethylene vapor barrier between the slab and the underlayment. This stops moisture from migrating up through the concrete and getting trapped under the planks. On glue-down installations, we apply the adhesive directly to the slab, so we use a weighted vinyl plank roller (75 to 100 pounds) to press each plank into the adhesive bed immediately after placement. The roller pushes out air pockets and forces full contact between the plank backing and the adhesive. This bonding step follows El Dorado County Building Department General Plan Section 7.4.2.4 Moisture Protection requirements, which mandate vapor retarders beneath all resilient flooring installed over concrete slabs in contact with the ground. Skipping the moisture barrier on a slab leads to mold growth, adhesive failure, and plank warping that voids the manufacturer warranty.
our vinyl plank flooring installation service include
Waterproof LVP for Kitchens, Bathrooms, and Laundry Rooms
Vinyl plank is one of the few flooring types that can handle standing water without damage. Both SPC and WPC cores are waterproof. Water does not soak into the plank, warp the edges, or cause mold the way it does with hardwood or laminate.
We install waterproof vinyl plank in:
- Kitchens around sinks, dishwashers, and refrigerators
- Bathrooms (full bath, half bath, powder rooms)
- Laundry rooms next to washers and dryers
- Entryways and mudrooms where wet shoes track in water
- Basements below grade with concrete slabs
The key is sealing the expansion gaps at walls and transitions with silicone caulk or covered T-molds so water cannot seep under the planks. We also recommend planks with a wear layer of 20 mil or higher for wet rooms because the thicker surface resists scratches from grit tracked in on wet shoes.
Vinyl Plank Over Concrete in Cameron Park Basements
Basements with concrete slabs are one of the best use cases for vinyl plank. The waterproof core handles the moisture that naturally moves through concrete, and the rigid structure does not flex or cup the way hardwood does on a slab.
We follow these steps for basement installs:
- Test the slab moisture level to confirm it is within the plank manufacturer's limits
- Install a 6-mil vapor barrier across the entire slab
- Lay underlayment for sound reduction and thermal comfort
- Install SPC rigid core planks (preferred for basements due to slab contact)
- Maintain expansion gaps at all walls, columns, and fixed objects
Cameron Park homes with finished or partially finished basements often have older carpet or sheet vinyl on the slab. We remove that old flooring, test the slab, and install fresh vinyl plank in one coordinated project.
What Makes Our Vinyl Plank Installations Last Longer

We Check the Subfloor Before We Touch a Plank
Every job starts with a flatness check, moisture test, and damage inspection. We fix what needs fixing first. That prep is what keeps the click-lock seams tight and the floor quiet for years.

We Match the Product to the Room
SPC for kitchens and basements. WPC for bedrooms and living rooms. Waterproof planks for bathrooms. We pick the right core type, wear layer, and installation method for each space.

We Know Cameron Park Homes
Hot, dry summers. Cold, wet winters. Concrete slabs that hold moisture. Raised foundations that shift. We plan every vinyl plank job around the conditions in your home and the climate outside.

We Handle Everything in One Project
Removal, subfloor prep, underlayment, installation, transitions, baseboards, and cleanup. One crew. One timeline. One price.
From Old Floors to New Planks in Four Steps
Most vinyl plank installations follow the same order. Each step sets up the next one. Rushing through prep or skipping the layout creates problems that show up as gaps, buckling, or noise within weeks.
01
Remove the old flooring
We pull up carpet (including tack strips and staples), old laminate, sheet vinyl, or other flooring materials. We haul everything away so the subfloor is clean and ready to inspect.
02
Prepare the subfloor
We check the surface for flatness, moisture, and damage. On concrete slabs, we grind high spots and fill low areas with a leveling compound. On plywood, we secure loose panels and patch soft spots. The subfloor needs to be flat within 3/16 of an inch over a 10 foot span for vinyl plank to lock together properly.
03
Install underlayment and start the planks
We lay down the underlayment (if the plank does not have an attached pad), then snap chalk lines to set the starting wall. The first row gets spacers along the wall to hold a 1/4 inch expansion gap. We cut the door jambs and casings so the planks slide underneath instead of butting against the trim. We use an oscillating multi-tool with a plunge blade to make flush cuts at the base of each door jamb. This tool vibrates at high speed and cuts the wood casing flush with the underlayment surface without damaging the wall or trim above. Clean jamb cuts let the plank slide under the casing for a finished look with no visible gap or caulk. This method meets NALFA/ANSI LF 01-2019 Section 6.4 dimensional stability testing standards, which govern how floating floors respond to temperature and humidity changes. Proper expansion gaps and jamb clearance prevent buckling when the floor expands during Cameron Park's hot summer months.
04
Set remaining rows, add transitions and trim
We stagger the end joints by at least 6 inches between rows to strengthen the floor and create a natural look. After the last row is cut and placed, we install T-molds at doorways, reducers where vinyl meets lower floors, and reinstall baseboards with shoe molding along the perimeter.

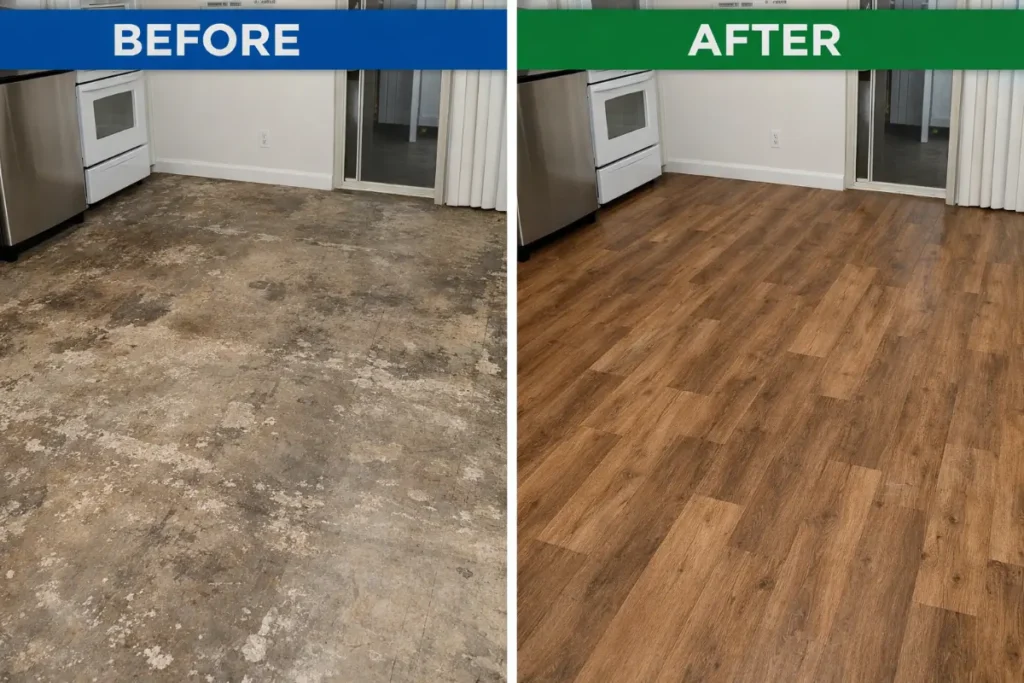
Vinyl Plank Flooring Installation – Before & After Transformation
This before-and-after image highlights a professional tile vinyl plank flooring installation completed in the same space. The before section shows a worn, stained, and uneven surface, while the after section reveals newly installed vinyl plank flooring with a clean, uniform finish. The transformation improves both durability and appearance, delivering a natural, realistic result consistent with real-world vinyl plank flooring installation outcomes.
Ready for Vinyl Plank That Stays Locked, Flat, and Quiet?
Whether you need waterproof planks in the kitchen, SPC over a concrete slab, or a full-home layout from the front door to the back bedroom, we can help. We will check your subfloor, walk you through the plank options, and give you a straight price with no hidden charges.
Call (916) 365-4251 to set up your free flooring inspection. Or fill out the form below and we will get back to you within one business day.
Vinyl Plank Flooring for Homes Across the Sacramento Foothills
We serve Cameron Park and nearby communities along the US-50 corridor and throughout El Dorado County.
We install vinyl plank flooring in:
- El Dorado Hills
- Shingle Springs
- Placerville
- Rescue
- Cameron Park
- Folsom
- Rancho Cordova
Vinyl Plank Questions Cameron Park Homeowners Ask Us
How much does vinyl plank flooring installation cost in Cameron Park?
The typical range is $5 to $12 per square foot installed. The final number depends on the plank type (standard vs. SPC/WPC), subfloor condition, and how many rooms are included. We give free on-site estimates so you get a real number, not a guess.
Can vinyl plank be installed over concrete slab?
Yes. We install vinyl plank on concrete slabs regularly. We test the moisture level first, then lay a 6-mil vapor barrier and underlayment before the planks go down. SPC rigid core works best on concrete because it does not flex.
What is the difference between SPC and WPC vinyl plank?
SPC (stone polymer composite) is thinner, harder, and more dent resistant. WPC (wood polymer composite) is thicker, softer, and quieter underfoot. Both are 100% waterproof. We recommend SPC for kitchens, basements, and high-traffic areas. WPC works better for bedrooms and living rooms where comfort matters.
Do I need subfloor leveling before vinyl plank?
If the subfloor is not flat within 3/16 inch over 10 feet, yes. Uneven spots cause rocking, seam stress, and clicking sounds when you walk. We check flatness during the free inspection and include leveling in the quote if needed.
Is vinyl plank waterproof?
Both SPC and WPC cores are 100% waterproof. Water does not soak into the plank or cause warping. The weak point is the seams, so we recommend sealing expansion gaps with silicone in wet rooms and using T-mold transitions at doorways to keep water on the surface.
How long does vinyl plank installation take?
A single room usually takes one day. A full home (1,000 to 2,000 square feet) with removal and subfloor prep takes three to five days. We give you a timeline before we start so you can plan around the work.
Can you remove carpet and install vinyl plank in the same project?
Yes. Carpet removal, tack strip and staple cleanup, subfloor prep, and vinyl plank installation all happen in one coordinated scope. We haul away the old carpet and pad so your home stays clean.
Is vinyl plank good for pets?
Yes. Vinyl plank resists scratches from claws better than hardwood. The waterproof surface handles accidents without staining. We recommend a wear layer of at least 20 mil for homes with large dogs to protect against deeper scratches.
Should I choose click-lock or glue-down vinyl plank?
Click-lock is faster and works for most residential installs. Glue-down creates a more stable floor and works better for commercial spaces or rooms with heavy rolling loads. We recommend the method based on your room type and usage.
Are you licensed and insured?
Yes. We hold a California CSLB C-15 Flooring and Floor Covering specialty license. We carry full general liability and workers compensation insurance. You can verify our license on the CSLB website.